
Your first question is most likely “What is a Vingette?”
It basically means a collection of objects using a variety of heights, colour and texture that are used to compliment home décor, and what’s even better is that they are so easy to put together.
By gathering some items from your home, and with a little practice you can create a great focal point to a table or a bookcase. They show the personality and style of your home.
No doubt you will have objects around your home that tell a story. Maybe it was a place you visited, an old heirloom or just a piece that you love. So, start gathering these together, choose a spot for your vignette and start telling your story.

Where should I display a vignette?
A vignette can be displayed on any horizontal surface. This could be a coffee table, kitchen workbench, bedstand, bookcase and even the floor. Don’t assume that these stay indoors, they also look great in areas of the garden too.
What kind of objects should I use?
The great thing about vignettes is that any object can be used such as greenery, candles, books, photographs, keepsakes and natural items such as driftwood, pinecones and shells. Bear in mind that the items you use should complement the style, colour and theme of your home.

Grouping items together
Generally, the items you have chosen should have a common element that will link them together such as:
Colour – All objects are of a similar colour but a variety of heights. A neutral colouring would be browns, whites, greys and creams with a touch of green.
Themes – Design your vignette to compliment your home décor. A coastal style would look great with driftwood, shells, roped candle holders, pebbles, glass and coral for example.
Collections – Any items that are from the same period, location or have common traits work well, however avoid too many items together as it will look cluttered from a distance. Keep collections spread out, at a variety of heights and similar in colour. Less is more!
Design features to consider when building a vignette
Balance several objects of similar height or colour at each side of a tall central object like a candle, painting or faux plant.
Scale the vignette to the size of the room or the surface it will be sitting on. A large table will require a large vignette displaying large objects.
Proportion Keep the objects in proportion to each other and the surroundings. Oversized on a small table will look cramped.
Colour Be mindful of the colour scheme you will be using for the vignette. Pick a key object and use this as the focus for the colour theme ensuring additional objects tie in with each other.
So where do you start? Well, let’s start to build a vignette together…
Start by deciding where the vignette will go and what it will be placed on. Do you need a base or will it sit directly on a horizontal surface? Some great uses for a base could be a mirror, tray, tile, wooden plinth or large plate, but if you have nothing that’s fine you can build direct onto any surface.
Next, take a wander around your home and grab items that you want to include, these can be books, candles, mirrors, photos, treasured items and natural fauna such as plants, pinecones, shells, coral or pebbles. Include personal items that are special to you as these will help to create your “story” and show who you are. Don’t worry too much about selecting similar colours just grab all the objects you would like to use. You will find that as you start to create your vignette, you will naturally discard items that you don’t need, so make sure you start with lots of items to choose from.

With all your objects in hand, just put them into piles. One pile that are similar in colour, one that are similar in style, or one that is a collection of personal items. You may have 3 groups or just one, but what is important is that you have these categorised.
Now comes the fun part where we can start to put these together.
I have decided that my vignette will sit on a coffee table and to make it easier to move off the table for dusting, I am placing them on a white tray that I already had sitting in a cupboard.
OK, so now start by standing the items together and moving them around to see which give the best visual impact and work well together.
Here are some tips to help you along the way……
- Make use of books (hardcover, old and in your chosen colour scheme, there are always plenty of these at op shops) or drinks coasters to give smaller items some elevation. This will add variety to your display creating visual interest and help to highlight key pieces.
- Try grouping pieces in odd numbers, particularly threes as this creates visual interest.
- Work with similar colours and textures that complement the room or area that the vignette will be displayed in.
- Play with contrasting textures and add natural features such as plants, pinecones or shells and make use of reflection using mirrors and glass.
- Take time to step back and review what you’ve designed. Don’t be afraid to remove items as the simpler the vignette is the better it looks.
- Think about practicalities on how the vignette could be used, candles and lamps are a great addition as they bring another dimension to the items when lit.
- Vary the scale and height within your vignette to allow the eye to travel freely over the display.
- Adding some greenery always goes a long way to bring the outdoors in and add a pop of colour and texture.
- Mirrors work well to add depth and reflection to your displayed objects.
- Overlap objects slightly but be sure that each item is visible and allow objects to touch if needed.
- Let your vignettes “evolve” by adding or taking objects away.
- Play with angles and lay items on diagonals to each other.
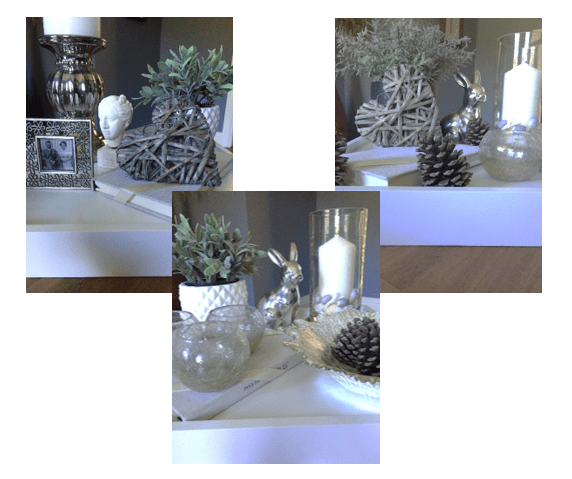
Here are 3 designs using the same objects I gathered. I have kept colours neutral to keep in style with the room décor. Utilising a white tray, I have placed items inside the tray using a book to raise smaller items. Reflective objects are utilised to bounce light and I have included candles to be lit in the evening.
So, what are you waiting for………..go gather your objects and start vignetting!
